Sunday, 21 October 2018

How to set boot-device with luxadm command in Solaris By Devan

How to set boot-device with luxadm command in Solaris

This procedure demonstrates how to easily use the “luxadm” command to set the “boot-device” Open Boot Prom (OBP) parameter from a system booted from cdrom or in single user mode.
The command will change the “boot-device” setting at the OS level and at the same time, change the “boot-device” setting at the OBP level. This procedure enables the “boot-device” to easily be changed for systems with storage devices whose device paths are not one of the built-in OBP boot aliases (disk, disk1, etc.).
This procedure is very beneficial because it accurately sets the boot device path without using the devalias command or typing the entire prom level hardware path to the root file system. This can be very difficult especially since users often do not have the World Wide Number (WWN) for the root disk.

Setting boot-device with luxadm

1. Boot the system to a supported Solaris bootable cdrom.
ok> boot cdrom -s
2. Mount the root slice to “/a”. (example is c0t0d0s0. Use the “format” command to view a list of disks)
# mount /dev/dsk/c0t0d0s0 /a
3. Find the link to the devices directory by long listing the root slice in /dev/dsk directory.
 # ls -l /dev/dsk/c0t0d0s0
lrwxrwxrwx   1 root  root 51 Jan 27  1997 /dev/dsk/c0t0d0s0 -> ../../devices/sbus@1f,0/SUNW,fas@e,8800000/sd@0,0:a
4. Run the luxadm command to populate the “boot-device” entry in OBP:
# luxadm -v set_boot_dev /devices/sbus@1f,0/SUNW,fas@e,8800000/sd@0,0:a
Output that is seen upon execution of above command:
Current boot-device = /sbus@1f,0/SUNW,fas@e,8800000/sd@0,0:a
New boot-device = /sbus@1f,0/SUNW,fas@e,8800000/sd@0,0:a
NOTE: The logical path can be used also. Here is an example using slice 0 of the controller 0, target 0, disk 0.
 # luxadm -v set_boot_dev -y /dev/dsk/c0t0d0s0
5. Verify the boot device is set correctly using eeprom command:
# eeprom boot-device
boot-device=/sbus@1f,0/SUNW,fas@e,8800000/sd@0,0:a
6. Unmount the root filesystem, shutdown the system and boot to test:
# umount /dev/dsk/c0t0d0s0
# halt
ok> boot
The system will now boot using the new entry for “boot-device.”
Note: If this physical path entry is long (not always desirable for viewing with setenv command, an alias to this path can be created at the OBP level with the devalias command and this alias can be used for “boot-device” entry.

Installing Oracle solaris 11 in Virtualbox By Devan

Installing Oracle solaris 11 in Virtualbox

A lot has been already said on Solaris 11 new features, its performance etc.. So, I just wanted get my hands dirty by testing the new Solaris 11. And what could be better than installing a Solaris 11 Virtual machine in virtual box. Here is how, you can also do it :

Prerequisites :

1. A laptop with atleast 2 GB RAM and around 50 GB of disk space
2. Oracle virtualbox software. (download here)
3. Oracle Solaris 11.1 iso image ( sol-11_1-text-x86.iso )
Solaris 11 iso image
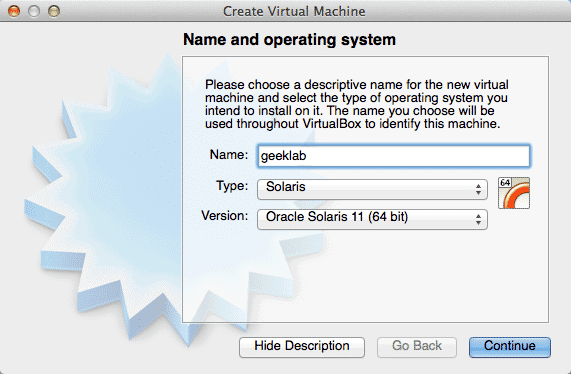
Let us setup a virtualbox virtual machine with solaris 11. Open the virtualbox software and click on new.
create new virtual machine solaris 11
We need to name the new virtual machine and set the type/version as Solaris/Oracle Solaris 11 (64bit)
name virtual machine solaris 11
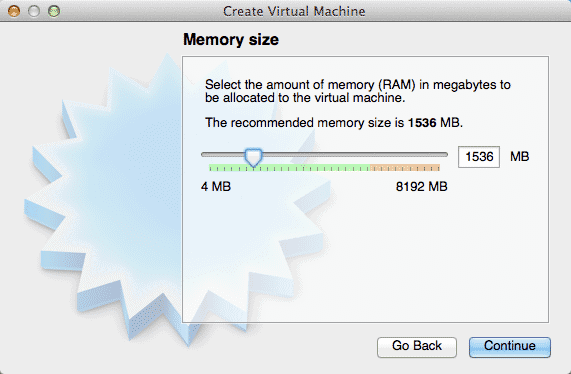
Set the Memory of the virtual machine to atleast 1.5 GB for a optimum performance.
set memory solaris 11
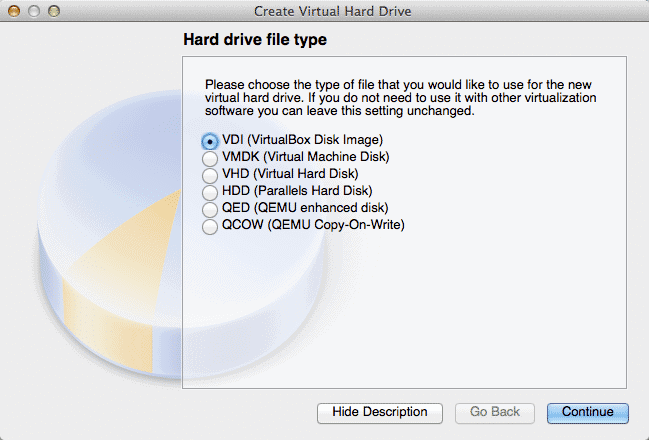
 We will be creating a new hard drive for the solaris 11 virtual machine.
create virtual hard drive now
 Now in case you want the virtual machine to be used in other virtualization softwares like VMware workstation etc., then select appropriate hard drive file type. I will be using the VM in virtualbox itself, so I am going to go with VDI (VirtualBox Disk Image)
hard drive file type
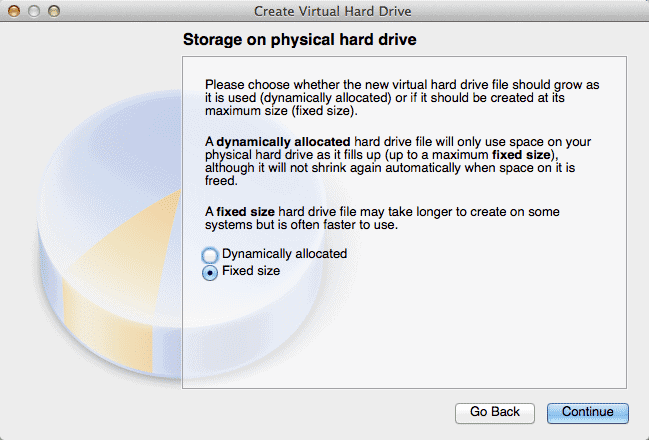
 In case of a dynamically allocated hard drive file, space is filled only when some data is written to it. I usually prefer fixed size hard drive as it is faster than the other dynamically allocated hard drive.
storage on physical hard drive
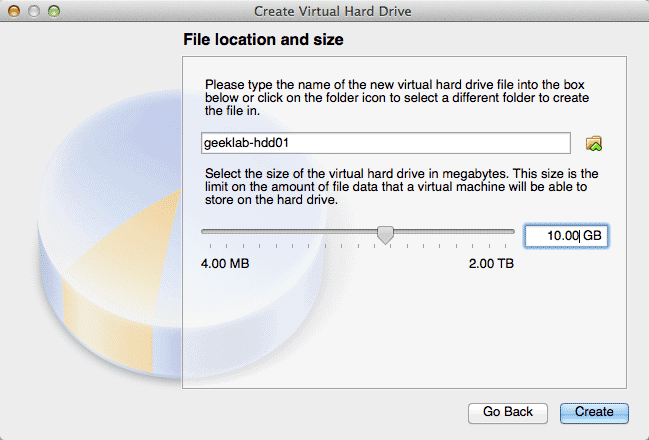
Name the HDD file we are going to create. You can also choose the location to store the hard disk file. I will be setting the size of hard disk as 10 GB.
file location and size
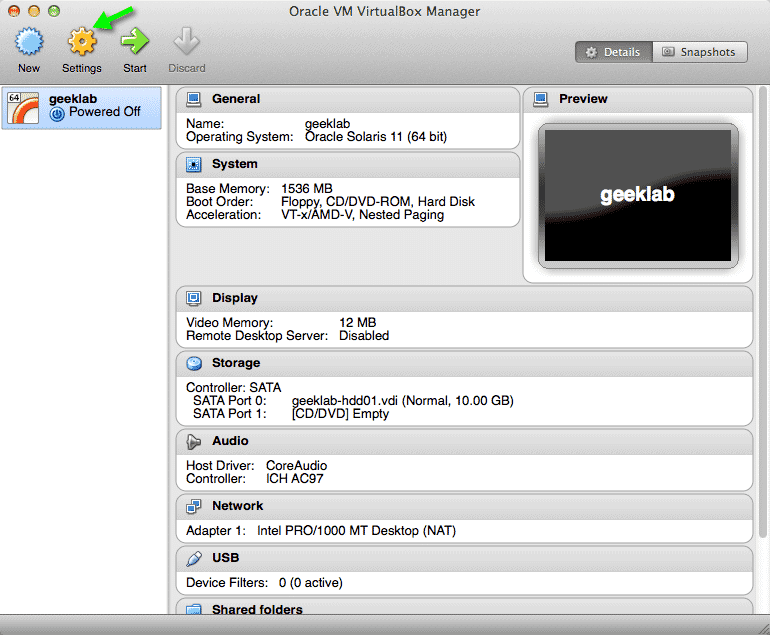
We are almost done with all the settings. There are few more settings to be done, so click on settings.
edit settings
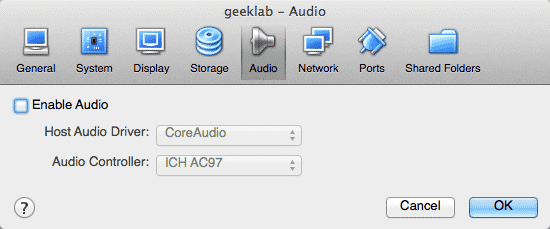
We do not need audio device for the virtual machine , so disable it.
audio
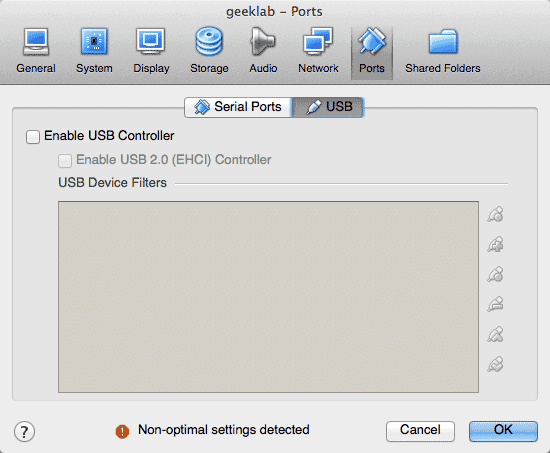
We also do not need the USB ports, So disable the USB controller too.
ports usb
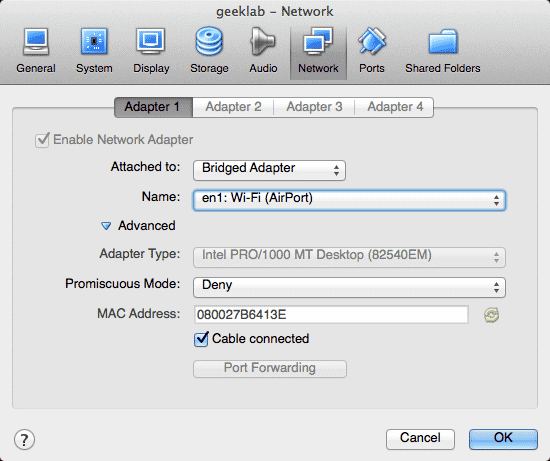
To be able to connect the Virtual machine from the host machine, select the bridged Adapter as the adapter 1 type and select the appropriate network hardware to be used from the host machine. I use Wi-Fi network in the host machine so I selected the Wi-Fi port. You may be using a ethernet card in host machine, so select it appropriately.
network
For the first time boot of the virtual machine, we need to boot it from the solaris 11 text install ISO image. Select the ISO of solaris 11 and click start to start the installation.
select iso image to install from
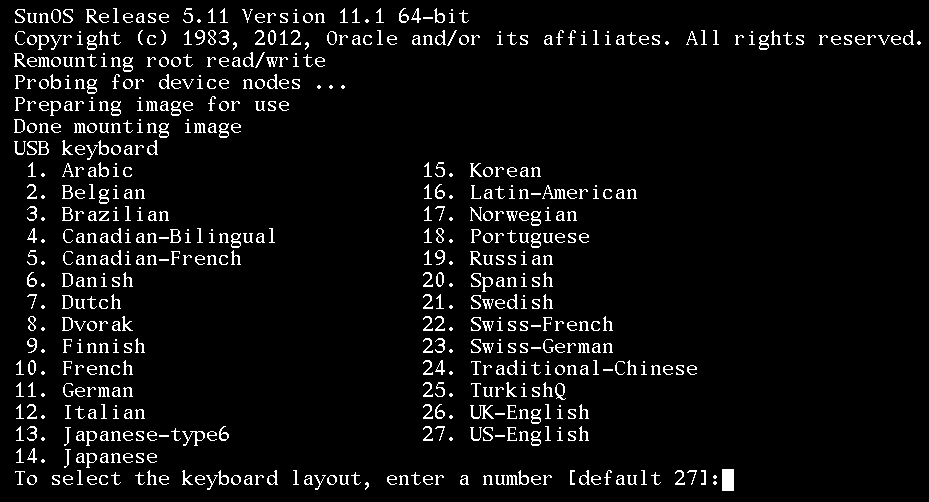
Select the default US-English keyboard layout and press enter.
keyboard selection
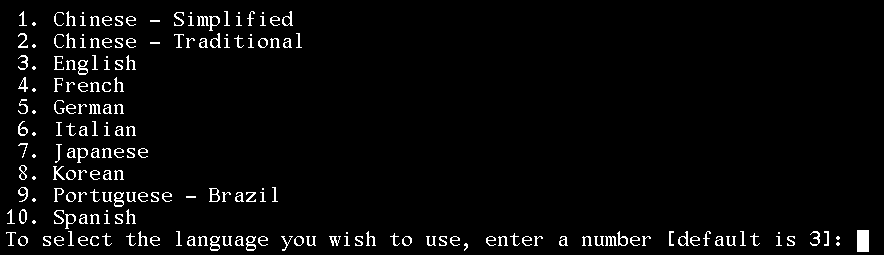
On the next screen select the default language as English and press enter.
language
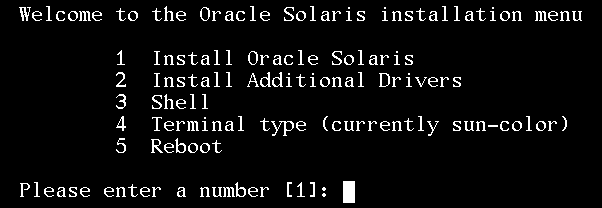
Select the option 1 to install the Oracle solaris 11.
installation menu
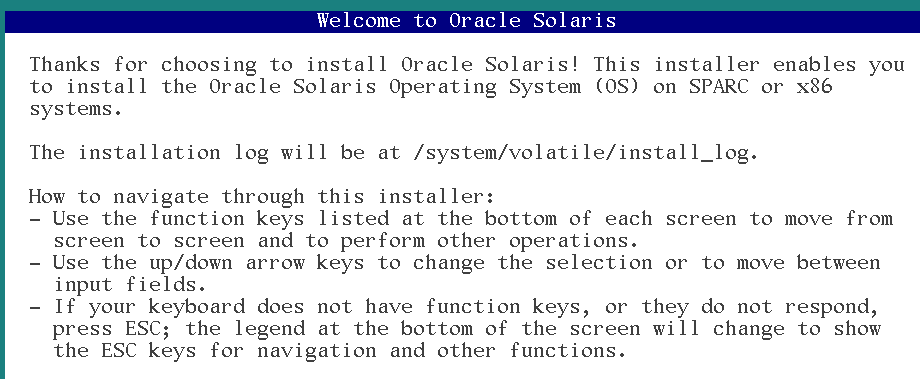
Now appears the Welcome screen of solaris 11. On this screen and all other screen we need to use ESC + 2 to go to the next screen.
welcome screen
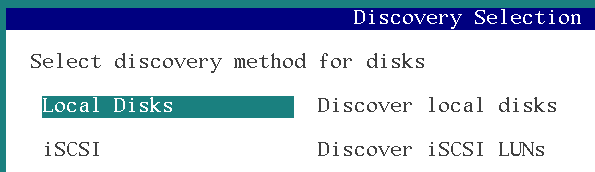
We will be installing solaris 11 on the local disk so select Local Disk as a discovery selection.
local disk for installation
The installer would discover the only hard disk we allocated for this installation. Select this hard drive and press ESC + 2.
select boot device
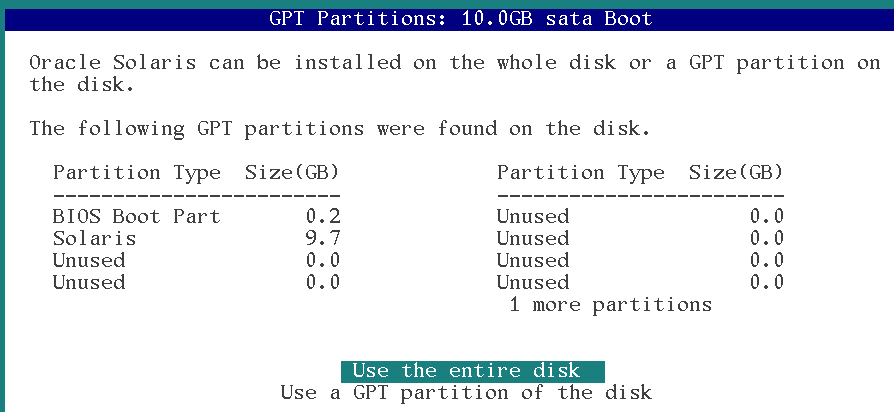
You can change the layout of the disk on the next screen. We would go with the default layout and use the entire disk.
select partition layout
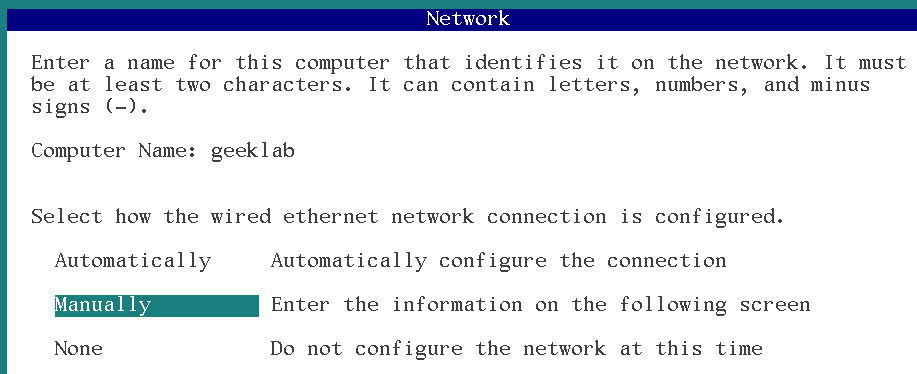
On the next screen give the hostname for the virtual machine (geeklab) and select manual configuration of the network configuration. As shown you can configure network automatically using the DHCP as well. But for this LAB let us use the manual configuration itself.
hostname
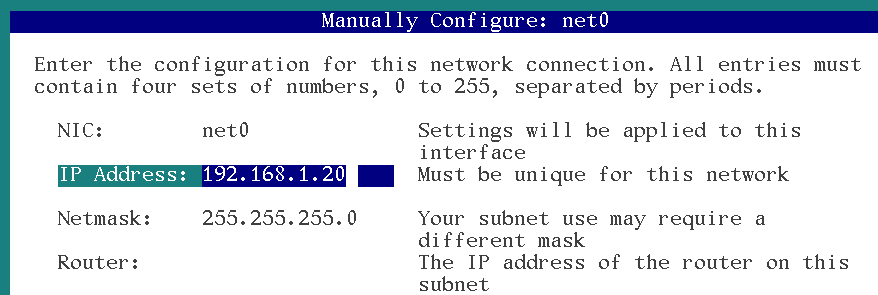
Provide the IP address and netmask for the interface net0. (192.168.1.20/24)
IP address
We do not need to use any DNS name service for this installation so select “Do not configure DNS”.
DNS
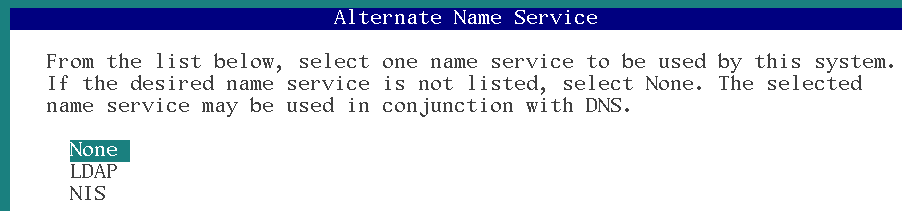
Select “None” For the Alternate Name Service option.
alternate name service
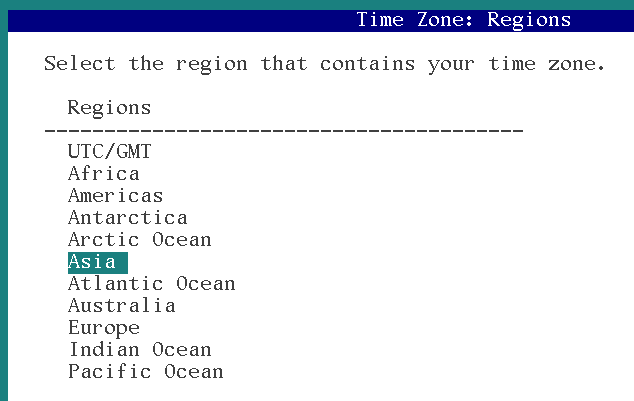
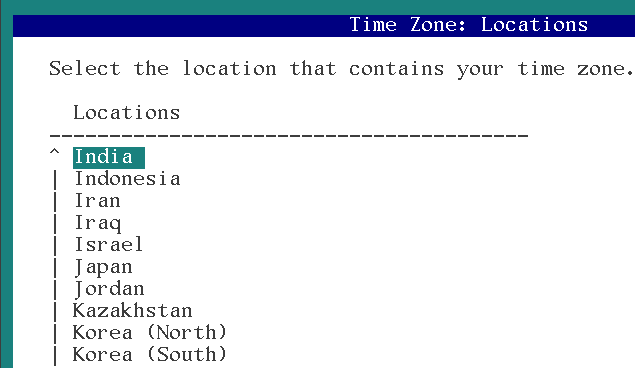
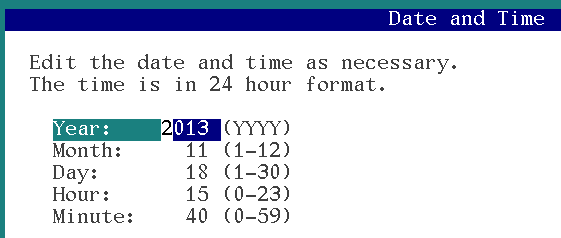
Now set the time zone according to your location. For me its india so I would choose Asia/India.
time zone asia
time zone india
time zone asia:kolkata
Confirm the time settings and go to the next screen.
confirm time zone
On the next screen set the root password . here you can also create any additional users if you want.
root password
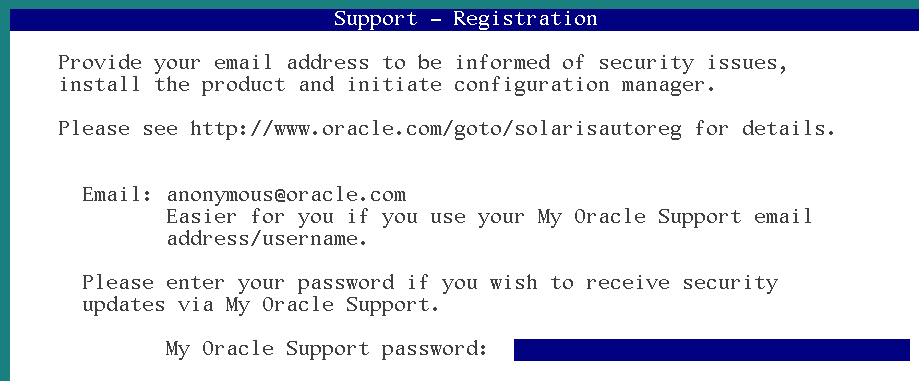
The enrollment for support is not required for this LAB setup so just go to next screens.
support registration
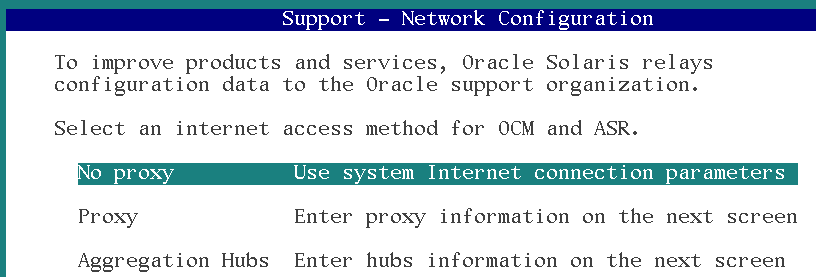
Select a no proxy network configuration as we are not going to use any proxy settings to connect to the internet.
no proxy
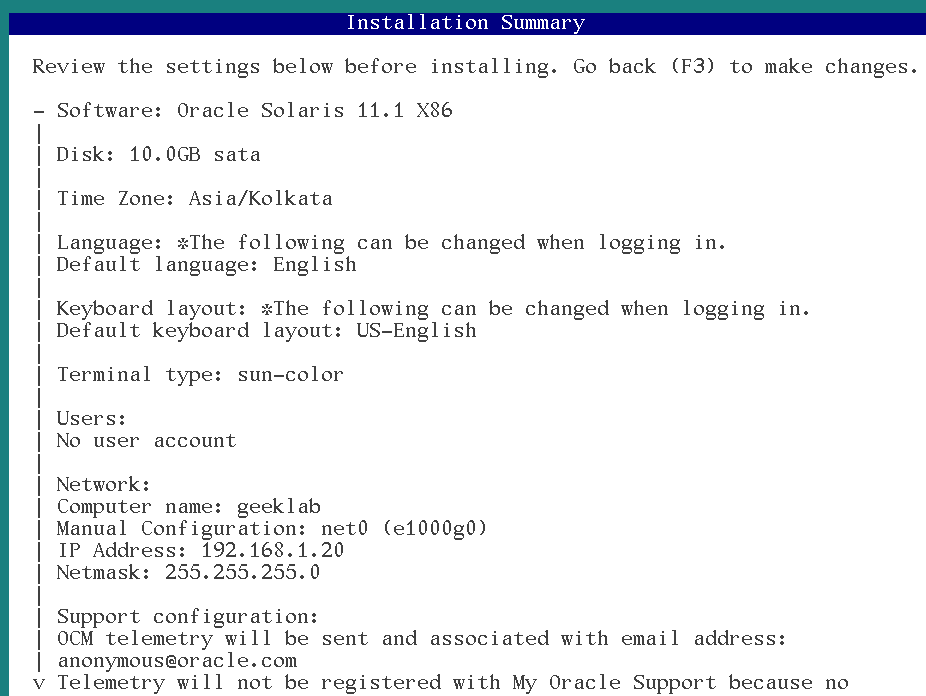
Check the final installation summary and verify them to start the installation of Oracle Solaris 11.
confirm all settings
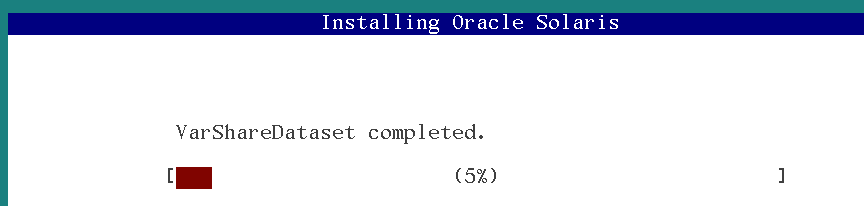
Now the installation would start which will not take more than 15 minutes.
installing solaris 11
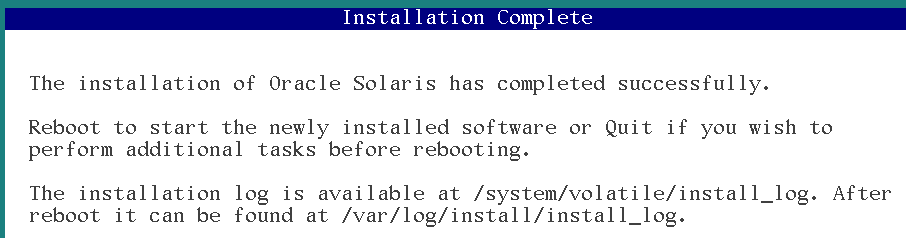
Once the installation is complete we need to reboot the OS. The key to reboot is ESC + 8 on this screen.
installation complete
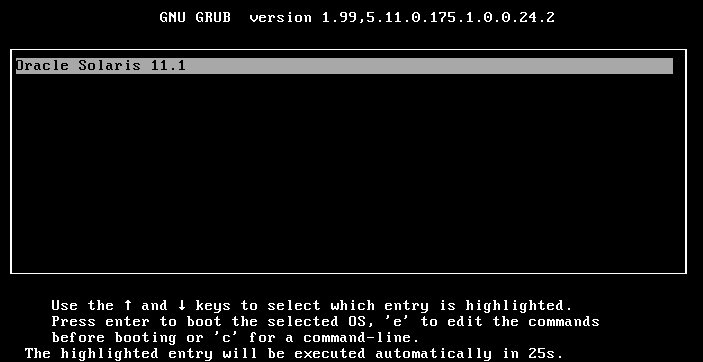
Do remember to remove the ISO image from the virtual machine or else the installation would start again. The OS would reboot and you can see the latest Solaris 11.1 OS up and running.
starting solaris 11

Enabling GNOME Graphical Desktop

Be default you won’t be able to use the graphical desktop in solaris 11. To enable the graphical desktop we need to add a package (solaris-desktop) from the IPS repository (refer Solaris 11 IPS series).
# pkg install solaris-desktop
# init 6
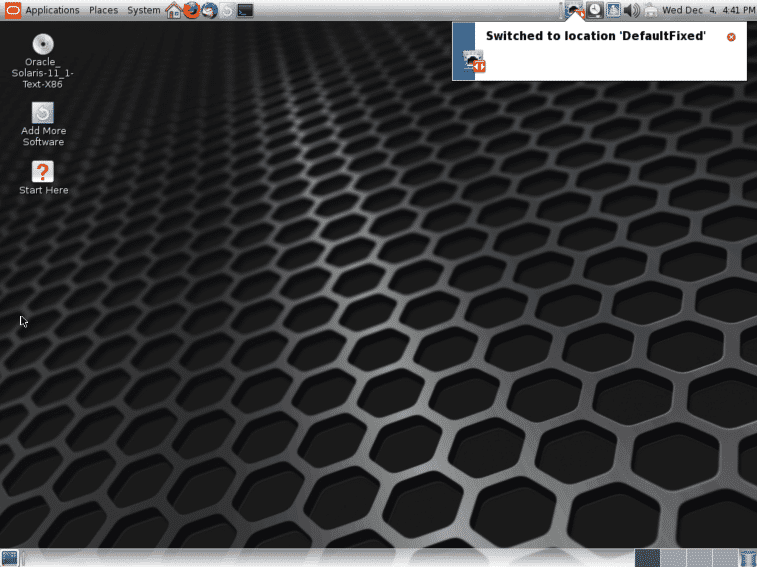
After rebooting the Virtual Machine and you should see the Graphical Desktop.
Desktop GUI solaris 11
I hope the post was informative. Do subscribe to stay tuned to the latest happenings on the blog.

Solaris 11 IPS hand-on LAB – Creating IPS repository By Devan

Solaris 11 IPS hand-on LAB – Creating IPS repository

Oracle Solaris 11 uses a completely new approach for package management. Now with Image packaging system (IPS) a system administrator can install, update and search packages from local or remote repository. The repository can be accessed with both command line and GUI interface.
The repository can be any one of the following :
1. Local repository
2. Remote repository in local network
3. Internet repository
Although a remote repository in a local network is a common practice in production setups as this gives a central repository and security and complete control.

Advantages of IPS:

1. Auto software dependency checking and validation.
2. Uses ZFS snapshot and clones features for creating instant backups and roll-backs in case any issue arises.
3. Easy replication of exact same set of softwares across many client versions.
4. Allows you to easily search, list, install, update, remove software packages for Solaris 11.
5. Create and manage boot environments.

IPS Vocabulary

1. Manifest : describes an IPS package
2. Repository : location either local or remote where packages are stored. The location is specified by Universal Resource Identifier (URI)
3. Publisher : Person or organization that provides the packages.
4. Image : Location where IPS package can be installed.
5. Catalog : Lists all the packages in a repository
6. Package archive : File containing publisher information and packages provided by the publisher
7. Boot environment : Bootable instance of an Image
7. Origin : Repository with both package metadata and package content.
9. Mirror : Repository that contains only package content. Similar to a download mirror to a file on the Internet. A secondary repository you may say.

Creating a Local IPS repository

1. Create a separate ZFS filesystem for repository
Create a dedicated filesystem for storing the IPS repository.
# zpool create sol_11_repo c1t2d0
# zfs set atime=off sol_11_repo
# zfs set compression=on sol_11_repo
The atime property do not update the access time of the files, thus reducing the write traffic when reading the files.
# zpool list sol_11_repo
NAME          SIZE  ALLOC   FREE    CAP  HEALTH  ALTROOT
sol_11_repo  14.9G    91K  14.9G     0%  ONLINE  -
# df -h /sol_11_repo
Filesystem             size   used  avail capacity  Mounted on
sol_11_repo             15G    31K    15G     1%    /sol_11_repo
2. Download, extract the repository
Now download the iso image of the repository from oracle site. It comes in 2 parts, so we have to combine it together as follows :
# cat sol-11_1-repo-full.iso-a sol-11_1-repo-full.iso-b > sol-11_1-repo-full.iso
Now mount the iso image on /mnt
# mount -F hsfs `lofiadm /tmp/sol-11_1-repo-full.iso` /mnt
Copy all the files in the repository to the mount point we created for the repository.
# sudo rsync -avz /mnt/repo/* /sol_11_repo/
We can now umount the mount point /mnt and remove the iso image.
# umount /mnt
# rm -fr /tmp/sol-11_1-repo-full.iso
3. Creating the repository
Create the infrastructure for the repository using the pkgrepo command.
# pkgrepo create /sol_11_repo
4. Build a search index
The repository creation command does not build the search index by default, so we need to create one
# pkgrepo -s /sol_11_repo refresh
Initiating repository refresh.
5. Enable Clients to access the Repository
To enable the client systems to get packages from the repository we have to set the origin for the publisher. To check the publisher of the repository we just created :
# pkgrepo -s /sol_11_repo/ info
PUBLISHER PACKAGES STATUS           UPDATED
solaris   4401     online           2012-09-27T22:22:59.530981Z
As shown above the Publisher for the repository is solaris. Fire the below command on the local client to be able to get packages from the local repository.
# pkg set-publisher -G '*' -M '*' -g /sol_11_repo solaris

-G '*' -> Removes all existing origins for the solaris publisher.
-M '*' -> Removes all existing mirrors for the solaris publisher.
-g  -> Adds the URI of the newly-created repository as the new origin for the solaris publisher.
Now check whether your repository works fine on the local system. The pkg list command will display all the packages available in the repository.
# pkg list -g /sol_11_repo
NAME (PUBLISHER)                                  VERSION                    IFO
FSWfontconfig-devel-docs                          0.5.11-0.130               --o
FSWxorg-client-docs                               0.5.11-0.130               --r
FSWxorg-client-programs                           0.5.11-0.130               --r
FSWxorg-clientlibs                                0.5.11-0.130               --r
FSWxorg-data                                      0.5.11-0.130               --r
FSWxorg-devel-docs                                0.5.11-0.130               --o
FSWxorg-headers                                   0.5.11-0.130               --r
FSWxwpft                                          0.5.11-0.130               --o
FSWxwrtl                                          0.5.11-0.130               --r
..................

Creating a Remote IPS repository

Remote IPS repository
Now the steps to create a repository which is accessible to all the systems in your production setup we have to do some extra steps in addition to what we did to configure a local IPS repository. First thing is to share the repos via NFS.
# zfs set sharenfs=on sol_11_repo
Now for the client systems to use the packages from the remote repository use the below command :
# pkg set-publisher -G '*' -M '*' -g /net/repo_server/sol_11_repo/ solaris

repo_server -> this is the central repository server
-G '*' -> Removes all existing origins for the solaris publisher.
-M '*' -> Removes all existing mirrors for the solaris publisher.
-g  -> Adds the URI of the newly-created repository as the new origin for the solaris publisher.
To check if we can list the packages use the command :
# pkg list -g /sol_11_repo

Using the default repository

Now every solaris 11 system is configured to have a default publisher solaris, which uses the public “release” repository : http://pkg.oracle.com/solaris/release. You don’t have to create this repository. If you have an internet connection to the solaris 11 host you can use this repository by default if you have not configured any other local repository. The public repository is not generally used in production as it is not secure, not customizable like the local repositories.

Updating an IPS repository

The local repositories must be updated to have the latest softwares. The update only copies the updated software files. This can be done in 2 ways :
1. Directly from the Public repository
I am using environment variables here, otherwise we can do it the other way by giving the source and destination in the pkgrecv command.
# export PKG_SRC=http://pkg.oracle.com/solaris/release/
# export PKG_DEST=/sol_11_repo
# pkgrecv '*'
2. Updating from a local repository
# pkgrecv -s 192.168.1.10:/sol_11_depo -d /sol_11_repo '*'
I hope the post was informative. Stay tuned for the next part in the hands-on series on IPS.

Solaris 11 IPS hand-on LAB – Managing software Packages By Devan

Solaris 11 IPS hand-on LAB – Managing software Packages

In the last post we created an IPS repository. Let us now see how we can manage the software packages in solaris 11. Now oracle has completely restructured the software management in Solaris 11 to simplify the software package administration. Lets start with some pkg commands.

Publisher Related Commands

To see which publisher configuration the machine is using
a. Local repository
# pkg publisher
PUBLISHER                   TYPE     STATUS P LOCATION
solaris                     origin   online F file://sol_11_repo/
b. Remote repository
# pkgrepo info -s /net/repo_server/sol_11_repo/
PUBLISHER PACKAGES STATUS           UPDATED
solaris   4401     online           2012-09-27T22:22:59.530981Z
To set a new publisher configuration
We can also the change the publisher :
# pkg set-publisher -g /net/repo_server2/sol_11_repo/
To check for updates for all the packages
Now we can see if there any available updates in the repository for the software packages already installed in the machine use the pkg update command with -nv option for dry run.
# pkg update -nv
Getting information about packages
To list the packages that are available in the repository :
# pkg list -g /net/repo_server/sol_11_repo/
To list the packages that are currently installed in the system :
# pkg list
We can also do a pkg list on a particular package.
# pkg list top
NAME (PUBLISHER)                                  VERSION                    IFO
diagnostic/top                                    3.8-0.175.1.0.0.24.0       i--
Here check the last column,
i in I column -> package is installed 
f in F column -> package is frozen
o in O column -> package is obsolete
r in O column -> package is available under new name
To get a detailed info about a package :
# pkg info top
          Name: diagnostic/top
       Summary: provides a rolling display of top cpu using processes
      Category: Applications/System Utilities
         State: Installed
     Publisher: solaris
       Version: 3.8 (3.8beta1)
 Build Release: 5.11
        Branch: 0.175.1.0.0.24.0
Packaging Date: September  4, 2012 05:17:59 PM
          Size: 229.39 kB
          FMRI: pkg://solaris/diagnostic/top@3.8,5.11-0.175.1.0.0.24.0:20120904T171759Z
Use -r to get the package information from the repository. In my case I have a updated top package
# pkg info -r top
To list the contents of the package and the paths, files that will be installed :
# pkg contents top
PATH
usr
usr/bin
usr/bin/top
usr/share
usr/share/man
usr/share/man/man1
usr/share/man/man1/top.1
We can search for a package which contains a particular file. For e.g. /etc/default/mpathd file.
#  pkg search mpathd
INDEX      ACTION VALUE              PACKAGE
basename   file   etc/default/mpathd pkg:/system/network@0.5.11-0.175.1.0.0.24.2

Installing packages

The installation and un-installation of packages in IPS is pretty easy. Let us first see how we can install packages using IPS.
Dry run
We can do a dry run before installing any package. use the switch -nv for this
# pkg install -nv vim
           Packages to install:        1
     Estimated space available:  5.37 GB
Estimated space to be consumed: 52.47 MB
       Create boot environment:       No
Create backup boot environment:       No
          Rebuild boot archive:       No

Changed packages:
solaris
  editor/vim
    None -> 7.3.600,5.11-0.175.1.0.0.24.0:20120904T172128Z
As shown above we can check whether the package requires a rebuild of boot archive, space required by it etc.. before actually installing it.
Now to actually install the package :
# pkg install vim
           Packages to install:  1
       Create boot environment: No
Create backup boot environment: No

DOWNLOAD                                PKGS         FILES    XFER (MB)   SPEED
Completed                                1/1     1528/1528      7.8/7.8    0B/s

PHASE                                          ITEMS
Installing new actions                     1673/1673
Updating package state database                 Done
Updating image state                            Done
Creating fast lookup database                   Done

Un-Installing packages

In case of uninstalling a package you can do a dry run as we did for installing it.
# pkg uninstall -nv vim
To actually uninstall an installed package :
# pkg uninstall vim
            Packages to remove:  1
       Create boot environment: No
Create backup boot environment: No

PHASE                                          ITEMS
Removing old actions                       1717/1717
Updating package state database                 Done
Updating package cache                           1/1
Updating image state                            Done
Creating fast lookup database                   Done

Solaris 11 IPS hand-on LAB – Boot environments By Devan

Solaris 11 IPS hand-on LAB – Boot environments

Boot Environments

Boot environments in solaris 11 are multiple images with different kernel, software applications and packages. Only one boot environment can be active at a time. We can boot into different boot environments according to our need. The command to manage boot environments in solaris is beadm. BEs are extremely useful in case of rolling back any software upgrades. The BEs are actually designed over ZFS file system, so its important to have ZFS file system for root.
Now by default we have a BE with name solaris when you install a fresh solaris 11 operating system.
# beadm list
BE      Active Mountpoint Space Policy Created
--      ------ ---------- ----- ------ -------
solaris NR     /          2.28G static 2013-11-19 02:41
As you can see the default BE solaris is the active BE on reboot (NR flag denotes Active on next reboot).
Let us now create a new boot environment called geekBE.
# beadm create geekBE
# beadm list
BE      Active Mountpoint Space  Policy Created
--      ------ ---------- -----  ------ -------
geekBE  -      -          150.0K static 2013-11-19 10:19
solaris NR     /          2.28G  static 2013-11-19 02:41
As you can see the new BE is created but its not active. Check the size of this BE, 150 KB. Check the size of the geekBE when you activate it.
To activate the new BE :
The geekBE will get activated on next reboot. As you can see in the Active column below (R denotes reboot)
# beadm activate geekBE
# beadm list
BE      Active Mountpoint Space Policy Created
--      ------ ---------- ----- ------ -------
geekBE  R      -          2.28G static 2013-11-19 10:19
solaris N      /          37.0K static 2013-11-19 02:41
If you can see now, the size of geekBE is 2.28 GB, as its active BE now.
We can also mount a BE to see the contents of it.
# beadm mount geekBE /mnt
Similarly to umount it :
# beadm umount geekBE
To list a complete information about the new BE we created :
# beadm list -a geekBE
BE/Dataset/Snapshot                          Active Mountpoint Space   Policy Created
-------------------                          ------ ---------- -----   ------ -------
geekBE
   rpool/ROOT/geekBE                         R      -          2.11G   static 2013-11-19 10:19
   rpool/ROOT/geekBE/var                     -      -          129.20M static 2013-11-19 10:19
   rpool/ROOT/geekBE/var@2013-11-19-04:49:13 -      -          42.0K   static 2013-11-19 10:19
   rpool/ROOT/geekBE/var@install             -      -          38.56M  static 2013-11-19 02:45
   rpool/ROOT/geekBE@2013-11-19-04:49:13     -      -          308.0K  static 2013-11-19 10:19
   rpool/ROOT/geekBE@install                 -      -          6.46M   static 2013-11-19 02:45

Installing packages in BE

You can install a package in a particular BE. If the BE is already active the you have to simply use the original pkg install command.
In case you want to add a package by creating a new BE :
# pkg install --be-name newBE vim
           Packages to install:   1
       Create boot environment: Yes
Create backup boot environment:  No

DOWNLOAD                                PKGS         FILES    XFER (MB)   SPEED
Completed                                1/1     1528/1528      7.8/7.8    0B/s

PHASE                                          ITEMS
Installing new actions                     1673/1673
Updating package state database                 Done
Updating image state                            Done
Creating fast lookup database                   Done
A clone of solaris exists and has been updated and activated.
On the next boot the Boot Environment newBE will be
mounted on ‘/’. Reboot when ready to switch to this updated BE.

Snapshots of BE

We can also take snapshots of BEs similar to the ZFS file system snapshots.
# beadm create geekBE@monday
The -s option in beadm list would also display the snapshot we just created
# beadm list -s geekBE
BE/Snapshot                   Space  Policy Created
-----------                   -----  ------ -------
geekBE
   geekBE@2013-11-19-05:47:00 311.0K static 2013-11-19 11:17
   geekBE@install             6.51M  static 2013-11-19 02:45
   geekBE@monday              0      static 2013-11-19 11:24
We can also create new BEs using the snapshots.
# beadm create -e geekBE@monday newBE
## beadm list
BE      Active Mountpoint Space Policy Created
--      ------ ---------- ----- ------ -------
geekBE  R      -          2.31G static 2013-11-19 11:17
newBE   -      -          60.0K static 2013-11-19 11:27
solaris N      /          90.0K static 2013-11-19 02:41
# beadm list
BE      Active Mountpoint Space  Policy Created
--      ------ ---------- -----  ------ -------
geekBE  -      -          150.0K static 2013-11-19 10:31
newBE   R      -          2.41G  static 2013-11-19 10:36
solaris N      /          2.78M  static 2013-11-19 02:41
When you install the vim package by creating a new BE, it gets automatically created and activated as well on next reboot.

Destroying BE

In order to destroy a BE use :
# beadm destroy newBE
Are you sure you want to destroy newBE?  This action cannot be undone(y/[n]): y
The BE that was just destroyed was the 'active on boot' BE.
solaris is now the 'active on boot' BE. Use 'beadm activate' to change it.
I hope the post was informative. Stay tuned for more on Oracle Solaris 11.

How to configure Solaris 10 Link Based IPMP By Devan

How to configure Solaris 10 Link Based IPMP

What’s a Link Based IPMP ?

The failure detection and repair method used by the mpathd daemon differentiates the IPMP as probe based or link based. In case of link based IPMP :
– The mpathd daemon uses the interface kernel driver to check the status of the interface.
– in.mpathd daemon observes the changes to IFF_RUNNING flag on the interface to determine failure.
– No test addresses required for failure detection.
– Enabled by default (if supported by the interface).
– One of the advantage of link based IPMP is it does not depend on external sources to send ICMP reply to ensure the link status and it also saves IP addresses as it is not require any test addresses for failure detection

mpathd Configuration file

mpathd daemon is responsible to detect an interface failure . It uses a configuration file /etc/default/mpathd to set various IPMP parameters.
# cat /etc/default/mpathd
#
#pragma ident   "@(#)mpathd.dfl 1.2     00/07/17 SMI"
#
# Time taken by mpathd to detect a NIC failure in ms. The minimum time
# that can be specified is 100 ms.
#
FAILURE_DETECTION_TIME=10000
#
# Failback is enabled by default. To disable failback turn off this option
#
FAILBACK=yes
#
# By default only interfaces configured as part of multipathing groups
# are tracked. Turn off this option to track all network interfaces
# on the system
#
TRACK_INTERFACES_ONLY_WITH_GROUPS=yes
The important parameters in mpathd configuration file are :
1. FAILURE_DETECTION_TIME : Time taken by mpathd to detect a NIC failure in ms (default value – 10 seconds)
2. FAILBACK : To enable or disable failback after the failed link becomes available (default vaule – yes)
3. TRACK_INTERFACES_ONLY_WITH_GROUPS – If turned on interfaces configured as part of IPMP are only monitored (default vaule – yes)
The command for in.mpathd daemon to re-read the configuration file is :
# pkill -HUP in.mpathd

Meanings of FLAGs

You would see flags such as NOFAILOVER, DEPRECATED, STANDBY etc.. in the output of “ifconfig -a” command. The meanings of these flags and parameters to enable them are:
deprecated -> can only be used as test address for IPMP and not for any actual data transfer by applications.
-failover -> does not failover when the interface fails
standby -> makes the interface to be used as standby
Testing IPMP failover
We can check the failure and repair of an interface very easily using if_mpadm command. “-d” detaches the interface whereas “-r” reattaches it.
# if_mpadm -d ce0
# if_mpadm -r ce0

Most commonly used Link-Based IPMP configurations

1. Single interface Link based IPMP configuration
This is not a very useful configuration, as it does not actually provide high availability. But can be used only to get intimated when an interface is failed.
Command line :
# ifconfig e1000g0 plumb 192.168.1.2 netmask + broadcast + group IPMPgroup up
For persistent configuration across reboots edit the files :
/etc/hostname.e1000g0
192.168.1.2 netmask + broadcast + group IPMPgroup up
Before failure :
# ifconfig -a
lo0: flags=2001000849[UP,LOOPBACK,RUNNING,MULTICAST,IPv4,VIRTUAL] mtu 8232 index 1
        inet 127.0.0.1 netmask ff000000
e1000g0: flags=1000843[UP,BROADCAST,RUNNING,MULTICAST,IPv4] mtu 1500 index 13
        inet 192.168.1.2 netmask ffffff00 broadcast 192.168.1.255
        groupname IPMPgroup
        ether 0:c:29:f6:ef:67
After failure :
# ifconfig -a
lo0: flags=2001000849[UP,LOOPBACK,RUNNING,MULTICAST,IPv4,VIRTUAL] mtu 8232 index 1
        inet 127.0.0.1 netmask ff000000
e1000g0: flags=11000803[UP,BROADCAST,MULTICAST,IPv4,FAILED] mtu 1500 index 13
        inet 192.168.1.2 netmask ffffff00 broadcast 192.168.1.255
        groupname IPMPgroup
        ether 0:c:29:f6:ef:67
2. Multiple interface Link based IPMP configuration
a. Active – Active configuration
Command line :
# ifconfig e1000g0 plumb 192.168.1.2 netmask + broadcast + group IPMPgroup up
# ifconfig e1000g1 plumb group IPMPgroup up
For persistent configuration across reboots edit the files :
/etc/hostname.e1000g0 
192.168.1.2 netmask + broadcast + group IPMPgroup up
/etc/hostname.e1000g1 
group IPMPgroup up
Before Failure :
# ifconfig -a
lo0: flags=2001000849[UP,LOOPBACK,RUNNING,MULTICAST,IPv4,VIRTUAL] mtu 8232 index 1
        inet 127.0.0.1 netmask ff000000
e1000g0: flags=1000843[UP,BROADCAST,RUNNING,MULTICAST,IPv4] mtu 1500 index 14
        inet 192.168.1.2 netmask ffffff00 broadcast 192.168.1.255
        groupname IPMPgroup
        ether 0:c:29:f6:ef:67
e1000g1: flags=1000843[UP,BROADCAST,RUNNING,MULTICAST,IPv4] mtu 1500 index 15
        inet 0.0.0.0 netmask ff000000
        groupname IPMPgroup
        ether 0:c:29:f6:ef:71
After Failure
# ifconfig -a
lo0: flags=2001000849[UP,LOOPBACK,RUNNING,MULTICAST,IPv4,VIRTUAL] mtu 8232 index 1
        inet 127.0.0.1 netmask ff000000
e1000g0: flags=19000802[BROADCAST,MULTICAST,IPv4,NOFAILOVER,FAILED] mtu 0 index 14
        inet 0.0.0.0 netmask 0
        groupname IPMPgroup
        ether 0:c:29:f6:ef:67
e1000g1: flags=1000843[UP,BROADCAST,RUNNING,MULTICAST,IPv4] mtu 1500 index 15
        inet 0.0.0.0 netmask ff000000
        groupname IPMPgroup
        ether 0:c:29:f6:ef:71
e1000g1:1: flags=1000843[UP,BROADCAST,RUNNING,MULTICAST,IPv4] mtu 1500 index 15
        inet 192.168.1.2 netmask ffffff00 broadcast 192.168.1.255
b. Active standby Configuration
Command line :
# ifconfig e1000g0 plumb 192.168.1.2 netmask + broadcast + group IPMPgroup up
# ifconfig e1000g1 plumb group IPMPgroup standby up
For persistent configuration across reboots edit the files :
/etc/hostname.e1000g0
192.168.1.2 netmask + broadcast + group IPMPgroup up
/etc/hostname.e1000g1
group IPMPgroup standby up
Before failure
# ifconfig -a
lo0: flags=2001000849[UP,LOOPBACK,RUNNING,MULTICAST,IPv4,VIRTUAL] mtu 8232 index 1
        inet 127.0.0.1 netmask ff000000
e1000g0: flags=1000843[UP,BROADCAST,RUNNING,MULTICAST,IPv4] mtu 1500 index 20
        inet 192.168.1.2 netmask ffffff00 broadcast 192.168.1.255
        groupname IPMPgroup
        ether 0:c:29:f6:ef:67
e1000g0:1: flags=1000842[BROADCAST,RUNNING,MULTICAST,IPv4] mtu 1500 index 20
        inet 0.0.0.0 netmask 0
e1000g1: flags=69000842[BROADCAST,RUNNING,MULTICAST,IPv4,NOFAILOVER,STANDBY,INACTIVE] mtu 0 index 21
        inet 0.0.0.0 netmask 0
        groupname IPMPgroup
        ether 0:c:29:f6:ef:71
After failure
# ifconfig -a
lo0: flags=2001000849[UP,LOOPBACK,RUNNING,MULTICAST,IPv4,VIRTUAL] mtu 8232 index 1
        inet 127.0.0.1 netmask ff000000
e1000g0: flags=19000802[BROADCAST,MULTICAST,IPv4,NOFAILOVER,FAILED] mtu 0 index 20
        inet 0.0.0.0 netmask 0
        groupname IPMPgroup
        ether 0:c:29:f6:ef:67
e1000g1: flags=21000842[BROADCAST,RUNNING,MULTICAST,IPv4,STANDBY] mtu 1500 index 21
        inet 0.0.0.0 netmask 0
        groupname IPMPgroup
        ether 0:c:29:f6:ef:71
e1000g1:1: flags=21000843[UP,BROADCAST,RUNNING,MULTICAST,IPv4,STANDBY] mtu 1500 index 21
        inet 192.168.1.2 netmask ffffff00 broadcast 192.168.1.255