
Beginners Guide to Configuring network virtualization features in Solaris 11
Network virtualization is the process of combining hardware network resources and software network resources into a single administrative unit. The goal of network virtualization is to provide systems and users with efficient, controlled, and secure sharing of the networking resources. The end product of network virtualization is the virtual network.
With server virtualization becoming more mainstream in the IT industry, the focus is shifting to a deployment model that uses network virtualization to support the sharing of network traffic amongst multiple virtual machines (VMs) or zones. Along with a rise in the adoption of cloud architectures that rely upon virtualization for deploying workloads, network virtualization is playing an even more critical role in the overall network administration strategy in Oracle Solaris.
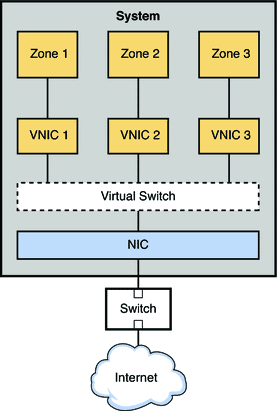
Using virtual infrastructure as shown in the figure above to consolidate physical systems in the data center, enterprises can experience the following:
- Lower total cost of ownership of servers
- Higher server utilization
- Increased operational efficiency
- Tighter security
Virtual Network Building Blocks
Below are the virtual network building blocks in Solaris 11.
1. Virtual NIC (VNIC)
A VNIC is a virtual network device with the same datalink functionality as the physical interface.
2. Virtual switch
A virtual switch is an entity that facilitates communication between virtual machines (VMs). The virtual switch loops traffic between virtual machines (inter-VM traffic) within the physical machine and does not send this traffic out on the wire.
3. Elastic Virtual Switch (EVS)
An EVS enables direct management of virtual switches. You can create EVS switches to deploy multiple virtual networks that span multiple hosts, within either a multi-tenant cloud environment or a datacenter. Additionally, you can connect any Oracle Solaris VNIC to an EVS switch or a virtual port. Such VNICs automatically inherit their network configuration from EVS.
Building a Simple Virtual Network
The figure below shows a simple virtual network with two Solaris zones. Whenever you create two or more VNICs on the same physical port, a virtual switch will be created at the MAC layer. The effect of the creation of the virtual switch is that traffic between Zone 1 and Zone 2 is switched at the MAC layer. As long as the VNICs share the same physical NIC and are on the same VLAN, this MAC layer virtual switch can be employed.
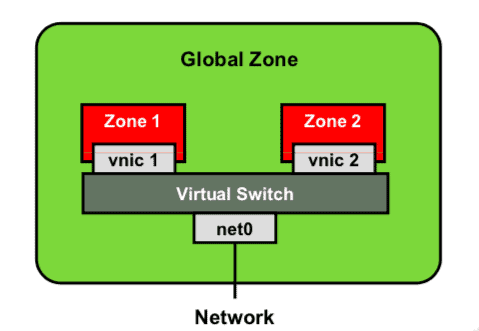
Example below shows you how to create two VNICs on the physical interface.
# dladm create-vnic -l net0 vnic1
# dladm create-vnic -l net0 vnic2
Configuring a Private Virtual Network
Shown in the figure, is a simple, isolated private virtual network with two Solaris zones. This virtual network consists of the following:
- GLDv3 network interface net0: This interface connects the global zone to the public network.
- Etherstub stub0: You use etherstubs to isolate the virtual network from the rest of the virtual networks in the system as well as the external network to which the system is connected. You cannot use an etherstub just by itself. Instead, you use VNICs with an etherstub to create the private or isolated virtual networks. You can create as many etherstubs as you require. You can also create as many VNICs over each etherstub as required.
- Three VNICs: vnic0 is created over etherstub stub0. This interface can be configured in the global zone to provide a route between the private virtual network (192.168.1.0) and the public network. Technologies such as IP forwarding, IP filtering, and Network Address Translation (NAT) can be used to customize the relationship between the private and public networks. VNICs vnic1 and vnic2 are also created over etherstub stub0 and are used to attach the nonglobal zones to stub0.
- Two exclusive IP zones: Each of the two exclusive IP zones has a VNIC assigned. vnic1 is assigned to Zone 3 and vnic2 is assigned to Zone 4.

# dladm create-etherstub stub0
# dladm create-vnic -l stub0 vnic0
# dladm create-vnic -l stub0 vnic1
# dladm create-vnic -l stub0 vnic2
Accessing a Virtual Network Configuration
Shown below are useful commands for accessing your virtual network configuration. The first command (dladm show-link) shows you how to list all the links configured in your system. This includes VNICs and etherstubs. The next command (dladm show-vnic) shows you how to list the VNIC links. The last command (dladm show-etherstub) shows you how to list the etherstubs.
# dladm show-link
LINK     CLASS       MTU      STATE       OVER
net1     phys        1500     unknown     --
net2     phys        1500     unknown     --
net0     phys        1500     up          --
net3     phys        1500     unknown     --
stub0    etherstub   9000     unknown     --
vnic0    vnic        9000     up          stub0
vnic1    vnic        9000     up          stub0
vnic2    vnic        9000     up          stub0
# dladm show-vnic
LINK     OVER      SPEED    MACADDRESS          MACADDRTYPE     VIDS
vnic0    stub0     40000    2:8:20:61:47:f6     random          0
vnic1    stub0     40000    2:8:20:81:e5:95     random          0
vnic2    stub0     40000    2:8:20:e9:10:18     random          0
# dladm show-etherstub
LINK
stub0
No comments:
Post a Comment